How do I Level a Travel Trailer? 10 Simple Steps Explained
The first thing you need to do when you get to a campsite is level your RV. Leveling can be easy for some, but can also be difficult depending on the situation. I have broke down the process into some easy steps.
How do I level a travel trailer?
To level a travel trailer, you must first park about a foot from where you want your final spot to be. Estimate the amount of lift and add leveling devices under tires by using a level on your floor. Drive your RV on the leveling device and recheck. Adjust leveling blocks as necessary.
Successfully leveling a RV can take a few tries, but once you learn your unit, the process should get easier to estimate leveling blocks needed over time. You need two simple tools to level your RV such as a 4′ level and leveling blocks. Never use your stabilizing jacks to level your RV.
Having a partner help level your RV can save several trips in and out of your tow vehicle checking on your trailer. If you do not have a spotter, a LevelMatePro along with Andersen Levelers can save time and energy by taking the guesswork out of leveling time.
Items Needed to Level your RV
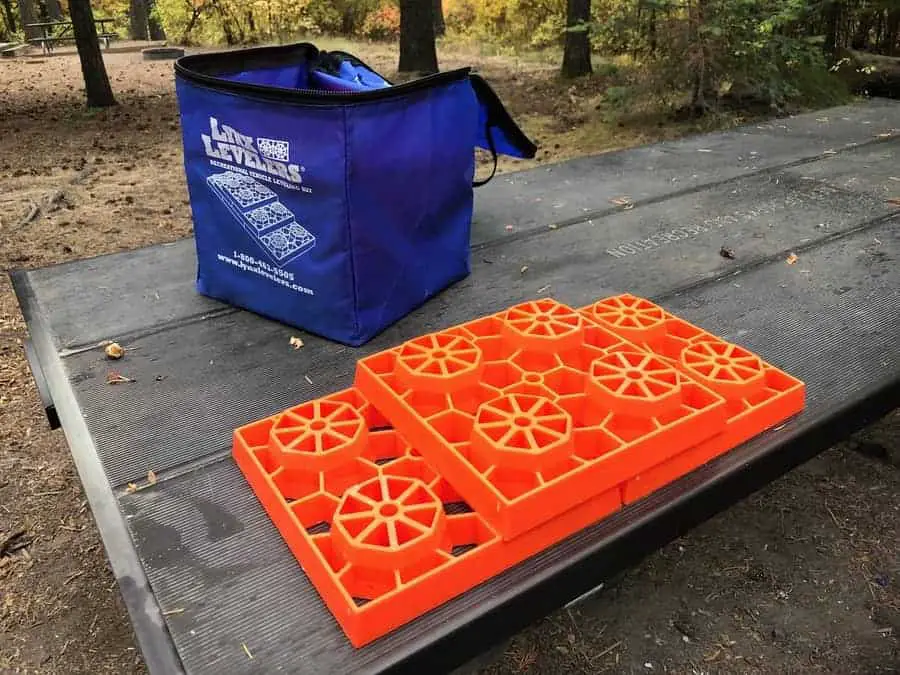
- Leveling Blocks
- 4’ Level or LevelMatePro
- Wheel Chocks
Level your Travel Trailer in 10 easy steps:
- Find the right parking spot
- Park about 1 ½’ away from where you want your RV to sit
- Check for level utilizing a 4’ level on your RV floor
- Estimate and install leveling blocks under RV tires
- Drive on leveling blocks
- Recheck for level
- If level, chock RV and unhook from vehicle.
- If not, go back to step 4
- Use tongue jack to level front to back and check level on floor
- Deploy stabilizing jacks
The Complete Guide to Leveling your RV
If you are either new to travel trailers, or are looking to brush up on your travel trailer skills, you always will have to know how and will have to level your RV. On your first trip, or your 300th, you still will have to level your RV.
Here is an in depth look at the process and items needed to level your RV.
Pick the Right Parking Spot
There are four considerations we look at when finding our camping spot.
- View- The first consideration we take when parking our RV is our view. We are camping in the outdoors, so we want to be able to look out the windows or sit under the awning and look at the best view possible.
- Sunlight/shade- A second consideration we take when parking our trailer is where the sun will be in the afternoon, or how we will get shade. Sunlight will be more important if you have solar panels installed on your RV, or if you like to basque in the sun. Personally, we like the sun as we are in the northwest when we are camping, but you may want to position your awning towards the afternoon sun to help cool your RV.
- Privacy- We take our privacy into account when positioning our RV as it compares with other sites. We like to sit down at dinner not looking directly at our neighbors. This is simple in some campgrounds, but not in others.
- How Level is the spot- Pick a spot to park that is most suited to be level to help aid you in leveling your trailer. If you pick a spot very unlevel, you may not have enough leveling blocks to level your RV.
Level your RV Side to Side
Types of Leveling Systems
There are two main types of leveling systems, the block type and ramp type.
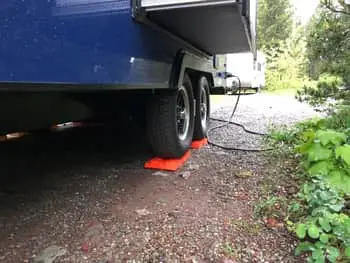
The block type are essentially like legos that stack together to build a platform to get height. The two top brands are Lynx and Camco. Read more about our favorite leveling systems here. Using the block type may take some guesswork and are only adjustable in 1” increments. Getting perfectly level may require pushing some gravel under the blocks to get a half inch here or there. The block type leveler can require several attempts on and off to get the proper amount of level.
Andersen makes the ramp type, which is simpler than the block type and also acts as wheel chocks. Place the ramps under your tires and drive forward until you are level and place the chocks under the ramp. The ramp type leveling system will take one attempt if you have a spotter or if you have a Level Mate Pro
After leveling side to side, you will chock your RV wheels with wheel chocks and preferably X-Chocks as well.
Level your Trailer Front to Back
Once your travel trailer is level side to side, you will need to level your RV front to back. This will require being unhitched from your tow vehicle. Once unhitched, simply use your tongue jack to go up and down to find level on the floor of your travel trailer. An electric tongue jack can save your arms from having to wind the jack up and down several times. Leveling front to back may be the easiest part of the process
Stabilizing your RV
After you are level in all directions, lower your stabilizing jacks to the ground or preferably a leveling block or 2×6. This will ensure your travel trailer stays still when you are parked and it does not move when you are walking around. Learn more about stabilizing your RV by reading our article on How to Stabilize your Travel Trailer. Read more about stabilizing your RV from our article here.
How to save time with Level Mate Pro
A LevelMatePro is a device that is installed and calibrated to your travel trailer when it is perfectly level. After it is calibrated, wherever you go, it will tell you how much lift to add to which side to become level.
To use a Level Mate Pro, load the app and connect via Bluetooth to your phone when you are about 1 ½’ away from your final camping spot. The app should tell you how much lift to install under which side of the travel trailer. If using leveling blocks, install the amount of lift the app says your trailer requires. If using the Andersen levelers, simply drive up the ramps and the app will alert you if you are level. Install the blocks under the ramps and you are done. The combination of the LevelMatePro and Andersen Levelers can save you 20 minutes of guesswork at leveling time.
Items that have to be level in your RV
- Fridge
- The fridge in your RV has to be level to function properly if it is an absorption fridge.
- Slide Out
- Your travel trailer will need to be level before you use your slide out as to keep it on its tracks. We have had our slide come off its tracks and it is not fun.
- Stove
- It is hard to fry an egg when the oil is sitting on one side of the pan, or if you are so tilted the pan slides off the stove.
Related Questions
How to level a travel trailer with a slide out?
Leveling a travel trailer with a slide out is the same process as one without. Make sure not to deploy your slide out until your RV is level as your slide can come off its tracks. Stow your slide out prior to unleveling your RV for the same reason of keeping it on its tracks.
Can stabilizer jacks be used to level a trailer?
No, stabilizer jacks are only to stabilize your RV and are not meant to hold much weight. Using stabilizer jacks to level your RV can damage your jacks or the frame of your travel trailer. Only use jacks after your leveling process is complete.
Be the first to be notified about FREE tips, hints, coupon codes, and email-exclusive information. All for FREE!