How To Drain Your RV Water Heater A Step-By-Step Guide
RV water heaters are essential to your camper or motorhome experience. Imagine your travels with no hot shower or water for cleaning. This invaluable feature needs routine care as replacing it is costly.
Routinely draining your RV water heater is necessary and as straightforward as removing a plug. It clears mold, bacteria, debris, and sediment buildup in the water system. Additionally, it maintains the upkeep of the system and lengthens its lifespan.
This article offers easy-to-follow steps on how to drain your RV water heater. It provides helpful tech tips and details the role and relevance of various water heater features. You must know the make and type of your RV water heater.
Why Do You Have To Drain An RV Water Heater?
Proper maintenance of your RV water heater is a requirement. Regularly draining your water heater promotes longevity.
A well-functioning water heater guarantees a comfortable journey with consistent heat that’s safe to drink.
Draining your RV water heater prevents serious issues.
- Sediment buildup creates numerous problems that frequent draining will help you avoid. For example, heat is applied from the bottom of a gas water heater. If the water is displaced due to excessive sediment buildup, it requires more energy to heat the water. As a result, your water gets warm and never hot.
- Corrosion from an anode rod will collect in the pipes and ruin your RV water system.
- Stale water is a breeding ground for dangerous bacteria. Regular flushing and draining keep the interior tank fresh.
- Draining your water system prevents foul odors. Water has natural occurring sulfates that react with various minerals and bacteria, producing a sulfuric acid smell (rotten eggs smell).
- Routine checks, flushing, draining, and sanitizing keep your RV in good condition.
- Draining your tank is vital during the winter seasons. As water freezes, it expands, breaking the tank, water lines, and plumbing. If your tank is left filled overnight, it’ll freeze and cause thousands in damage. Winterize your pipes and tank with RV antifreeze after draining your tank.
Replacing your RV water heater is expensive and unnecessary with the proper care. It would be best to replace your RV water heater only once it’s undergone its expected life cycle.
The average life span of an RV water heater is anywhere from six months to ten years.
Draining your RV water heater prevents debris accumulation, clogging of corrosive elements, and various health issues.
After you drain your RV hot water tank, you may want to read this article about 5 other items to look at when performing RV water heater maintenance.
How Often Should You Drain And Flush Your Hot Water Heater?
Draining your water heater must be a part of your RVing routine. However, when traveling, it isn’t necessary to drain your tank as the water gets used throughout the day.
Please be mindful that sitting water breeds pathogens- salmonella, E-coli, and listeria. So, when your RV excursion is done, drain, sanitize, and dry your tank.
When to drain your RV water heater.
- Before your motorhome journey
- After your vacation
- For avid RV travelers- four to six times a year
- If your RV has been stored for a while without use
- When water sits in the tank for over three days
- Drain before a below-freezing temperature night, whereby the water is sure to freeze
- After you winterize and RV antifreeze could have been in there (here’s the steps on what to do if you do have RV antifreeze in there)
Drain your RV water heater before winterizing your RV piping.
How To Drain Your RV Water Heater
Draining your RV water heater is a simple process that does require some know-how. It’s more than going outside, lifting the panel, and unplugging the drain.
For example, you must know the role of an anode rod and how it can be beneficial and detrimental to your water system.
There are essential tech tips, like using a clamp-on amp meter to test the electric heating element.
It’s necessary to understand the relevance and function of the burner tube and how improper maintenance will prevent your RV from having hot water.
It’s a good idea to refer to the water heater manual if you have it. There are different brands like Suburban, Dometic, and Atwood.
Water heaters use other power sources like gas (propane), electric, engine, or both.
Familiarize yourself with your RV’s water heater.
Step 1: Remove The Drain Plug

Before you begin to do anything, turn off your RV’s power. Whether gas or electric, switch off the water heater at the source. It’s done via the control board for electric or closing the propane valve for gas.
Then, turn off the water supply. Once the water supply is off, open every tap in your RV, as this relieves the pressure.
Relieving pressure is vital. You’ll see in step two that if pressure isn’t relieved, unplugging your drain will cause the anode rod to fly out with great force and speed. There’s a risk of severe injury.
Allow the water to cool completely. (You may have to wait a while.)
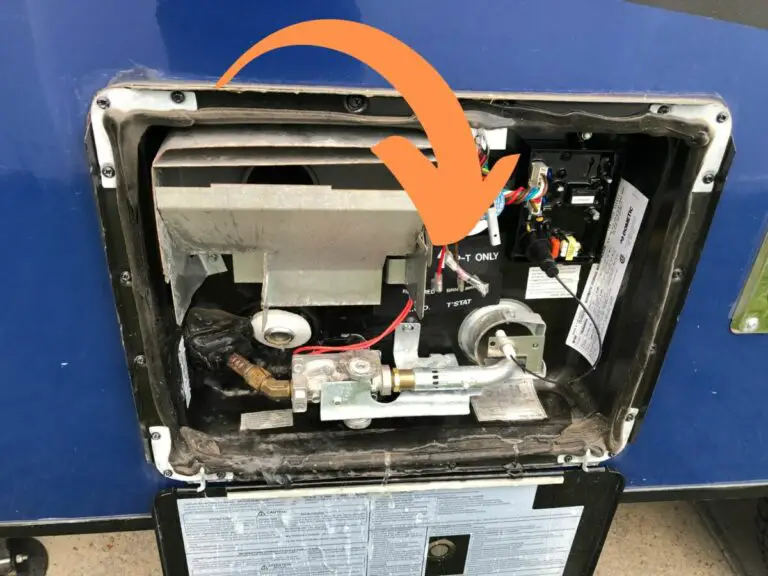
The water heater is located behind a panel on the RV’s exterior.
Inspect the surrounding drain area, as debris, grime, and dirt may obstruct the airflow necessary to ignite the gas/propane heating system.
Once the power is off and the water cools, remove the drain plug.
You require a socket or crescent wrench to remove the drain plug.
Never use pliers to try remove your plug as you can damage the fragile plastic.
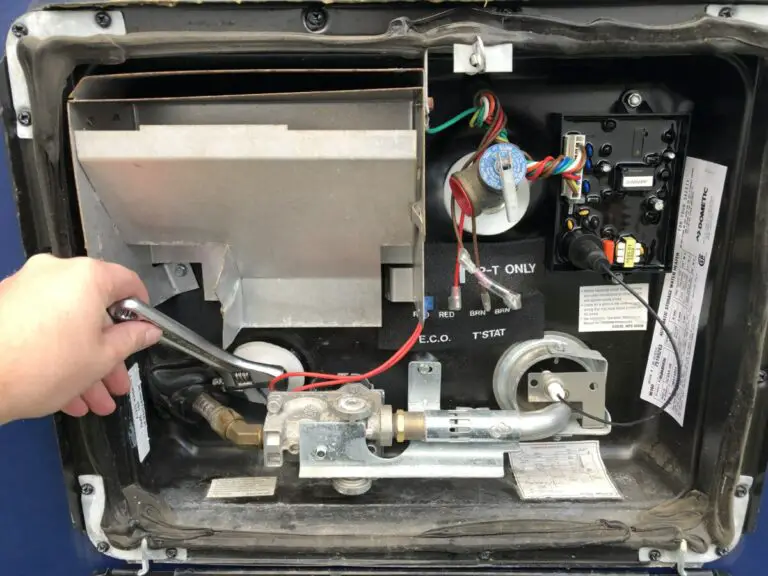
Step 2: Open Pressure Relief Valve
Opening the pressure relief valve releases powerful built-up water and air pressure which helps the water flow and prevents risky expulsion.
Releasing the pressure valve first prevents the anode rod from shooting out and potentially harming you.
The valve releases the built-up pressure stored behind the drain plug.
The pressure relief valve is on the outside of your RV within your water heater panel. Open the panel and flick the switch up.
The valve is easily identified as it’s shaped like a small leaver.
When you open the valve, water will forcefully stream out.
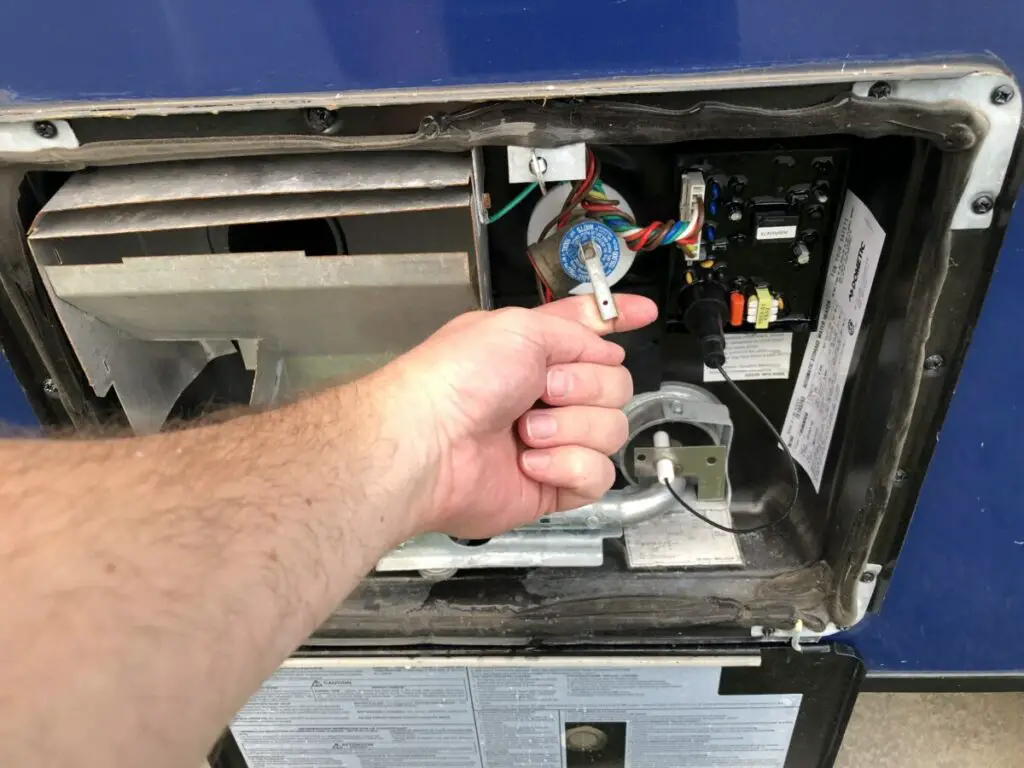
Step 3: Remove The Anode Rod (If Applicable)
The anode rod is a metal rod made primarily from magnesium (also aluminum and zinc). It plays an integral role in the longevity of your RV water heater system.
Firstly, a brand-new anode rod has a natural electric current that kills harmful bacteria. This is invaluable for outdoor travel, as water is sourced from various areas. So it’s an excellent preventative measure.
When replacing your anode rod, DO NOT CHEAP OUT and purchase a 2 pack of no name brands on Amazon, buy a quality unit like this model. In this case you truly get what you pay for.
Secondly, through electrolysis, anode rods prevent the steel in your RV water heater from rusting and the heating element from corroding.
Referred to as a sacrificial rod, it rapidly diverts corrosion from the other metals unto itself.
The anode rod has an enhanced negative electrochemical potential that resonates at a lower frequency. This means it corrodes faster than the metal in the water heater.
The anode rod protects the water heater due to the speed at which it corrodes. So, checking it annually and replacing it is vital to the water system. The corroded pieces cause all types of damage.
Unfastening your anode rod is simple. If it’s time to be replaced, it’ll come loose quickly. Clear away the corroded debris with an ice pick or wire brush.
Step 4: Check The Electric Heater Element
You must verify that your electric heating element is functioning periodically.
An electric heating element is used instead of a gas-fueled flame on some RV water heaters. However, there are water heaters that accommodate propane with electric.
Again, learn about your specific water heater model. Navigating it is more straightforward if you know about the make.
The Suburban water heater heating element is more accessible to inspect as, typically, they’re on the front of the water heater. In contrast, Atwood is more challenging because it’s situated behind the heater.
A helpful shortcut is using a 12 volt compatible clamp-on amp meter on the RV electric control panel.
Here are simple steps to using a clamp-on amp meter to check the electric heater element.
- Open the RV access panel (circuit board) and find the water heater power switch. A water heater will have its own circuit, unlike some circuits that share a controller- for example, on some RVs, the air conditioner and microwave share circuit switches.
- The access board has a reference guide for the power switch number and corresponding circuit.
- After locating the proper circuit, clamp the amp-meter around it.
- Your clamp-on amp meter must have AC/DC voltage and AC/DC amperage.
- Then, turn on the water heater.
- The clamp-on amp meter must read between ten to twelve amps. Then you know your electric element is working well.
It’s advisable to keep a clamp-on amp meter in your RV tool kit. Buy a quality unit that is comparable with measuring 12 volt amps with the clamp on like this model.
You can purchase a clamp-on amp meter for anything between $24, $70, and $120.
Step 5: Inspect And Clean The Vents

There is a combustion chamber for the propane burner within the outside that is behind the sheet metal in the top left of the photo above. You will need to inspect the vent for any bees nests, or other items that can get in there that could block the combustion process.
Use a coat hanger or brush to clean out any debris that you find blocking the chamber.
Step 6: Inspect And Clean Out The Burner Tube
Your RV water heater has a burner tube if it runs on propane or gas. That is, the burner tube directs propane to the burner.
Your RV water burner tube is simple to clean.
If your burner has dirt, debris, or spiders obstructing the air passage, there won’t be an adequate supply of gas to the heater– which willno longer work.
Compressed air or pipe cleaners will clear the tube. Inquire at RV stores for disposable compressed air canisters. Add a couple of canisters to your RV tool kit.
Step 7: Rinse Out the Hot Water Heater
Flushing your RV with a rinser or flushing wand is an essential maintenance requirement.
Flushing removes sediment, bacteria, and mildew buildup.
This process follows the same steps as draining with one exception.
- After draining, attach the RV water cleaner wand to a garden hose and place it in the drainpipe.
- Turn on the hose and flush the interior of the water heater tank.
- Flush and drain four to eight times, depending on the state of your water heater.
What Size Socket Do I Need To Drain My RV Water Heater?
Generally, you can use a 7/8-inch socket.
For a Dometic and Atwood RV water heater, you’ll need a 1/2-inch socket, and for a Suburban, you must have an 11/16-inch socket.
Be careful not to strip the plug, as it may be made of a softer synthetic than your wrench, for example, nylon.
Things To Expect When You Flush A Water Heater
Things to expect when you flush a water heater include excess sediment buildup, grime, algae, mildew, slime, metal, and rust-corrosive elements.
FAQ
Where Is The RV Hot Water Heater Drain?
Your RV hot water heater drain is in a screw-tightened panel on the motorhome’s exterior.
Conclusion
It’s essential to routinely drain your RV water heater to clear the system of sediment buildup, dirt, and debris. Draining promotes your system’s longevity and keeps your RV water heated, clean, and safe to drink. It’s a straightforward process, yet there are various features that you must familiarize yourself with, like the anode rod and clamp-on amp meter.
Be the first to be notified about FREE tips, hints, coupon codes, and email-exclusive information. All for FREE!