10 Reasons Why Won’t Your RV Water Heater Stay Lit And How To Fix It
Whether your RV is your permanent mobile home or a chance to spend a few days traveling the country, one thing you can’t comfortably live without is hot water. Your RV may have its own water tank that feeds your heater, or you may have a tankless system that is connected to the campsite water supply. But what happens if your water heater won’t stay lit? And how do you fix it?
The most common causes for your RV water heater not staying lit are poor gas flow, faulty sensors, thermal fuse, air in the gas lines, bad thermocouple, bad control board and many more reasons. Many of these can be simple fixes that can be done at the campground which we explain further below.
Whether you are in a campsite in winter or boondocking in the middle of nowhere in the summertime, a shower at the end of the day is not just a luxury, it’s a necessity (and we’re not even talking about doing the dishes!) So, when your water heater fails to stay lit, and there is not a drop of hot water available, you need to know how to fix it.
Before diving into the possible causes, it is crucial to ensure that you follow safety guidelines while working on your RV water heater. Make sure to turn off the heater, disconnect the power supply, and allow the system to cool down before attempting any repairs. Remember to refer to your RV owner’s manual or consult a professional technician if you are unsure about any of the steps or procedures.
Common Reasons for RV Water Heater’s Not Staying Lit:
There can be various reasons why your RV water heater won’t stay lit. Let’s explore some common causes and how you can fix them.
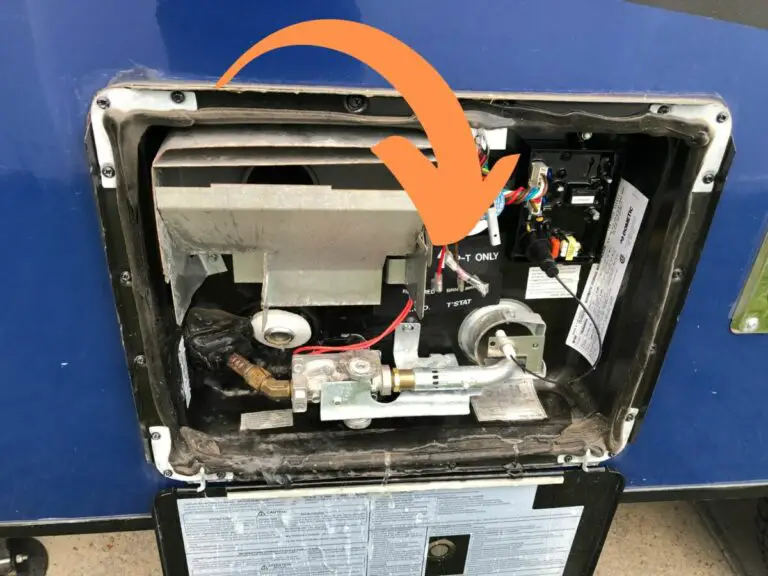
1. Pilot light and ignition system: The pilot light is essential for initiating the water heater. If the pilot light won’t stay lit, check the electrode and the wiring connecting it to the control board. Look for any signs of physical damage or wear. Additionally, the ignition system and ignitor might be malfunctioning, which can also prevent the pilot light from staying lit.
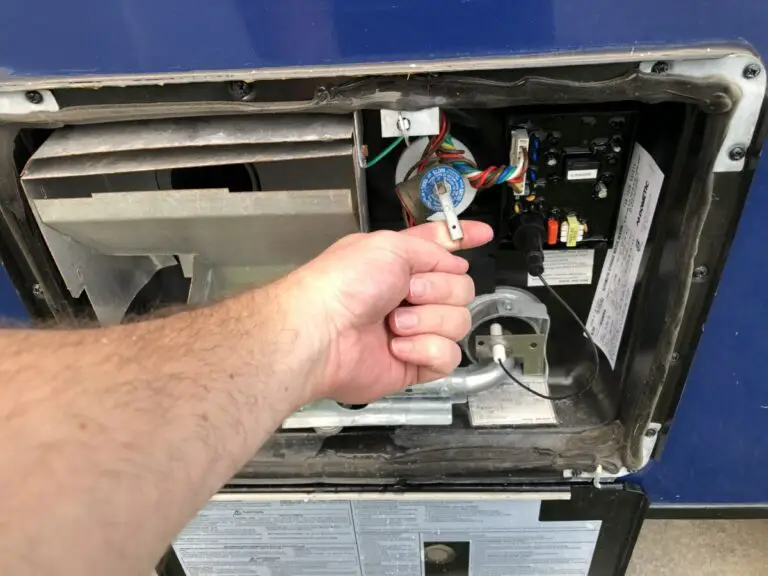
2. Faulty Thermocouple: Thermocouples are found on most RV heater systems. They are safety devices that detect when the pilot light goes out and shuts off the gas supply. Part of the thermocouple is a sensor probe that extends about 3/8″ into the pilot flame and converts the heat from the flame into an electrical impulse sent to an electronic control valve that controls the gas flow.
Thermocouples wear out and are also affected by carbon build-up on the sensor and deteriorating connections. The result is that they may not detect a flame when there is one, and may shut down the gas supply after a few seconds or minutes.
How to fix it: Firstly, make sure that the thermocouple is clean and free from carbon deposit build-up. Use an emery cloth to clean it and ensure that there is no corrosion on the electrical connection. You might need to remove the thermocouple from the burner to clean it, but it’s a delicate device, so treat it gently.
When replacing the thermocouple make sure it’s positioned correctly so that the sensor is in the center of the burner and inside the flame area. If it still doesn’t detect the flame after this cleaning process, you’ll need to replace it with a new one.
3. Control board and wiring: The control board, also known as the igniter board or circuit board, is the “brain” of the heater and monitors all system functions. If it doesn’t sense a flame from the pilot light or igniter, it will turn off the heater. However, if there is a strong flame, and it is nevertheless shutting down the heater, there may be a problem with the control board itself.
How to fix it: Exposure to heat, dust, and moisture can cause the control board to malfunction, so you can try cleaning it and checking connections to the ECO and thermocouple. However, there’s no easy way to fix a control board. If it starts to malfunction, the only fix is to replace it.
4. Electrical issues: Your RV water heater can run on electricity, battery power, or shore power. Check all the fuses in the fuse box – a blown fuse could cause the water heater to not function properly. Ensure that all power sources are properly connected and the electrical wiring isn’t damaged or frayed.
5. Thermostat and gas valve: The thermostat is responsible for regulating the water heater’s temperature. If the thermostat is faulty, it may cause the unit to not heat water or maintain the set temperature. Examine the thermostat for any damage or defects and replace it if necessary. A malfunctioning gas valve can also cause issues, making it impossible for the water heater to stay lit. Inspect the gas valve for any signs of damage and replace it if needed.
6. Low Propane Levels/ Gas Supply Issues: Sounds crazy, doesn’t it? But often, the reason the heater won’t stay lit is the most obvious – the propane level has dropped, and the pressure has reduced so much that the flame is weak. As a result, the control board doesn’t sense it and turns the heater off.
How to fix it: Don’t start out on your trip without filling your propane tanks, and don’t let the level drop below 25%.
7. Air In The Gas Lines: If you haven’t run your heater for a while or if you’ve disconnected the gas lines for some reason, it’s possible that there is air in the system, which will affect the flow of gas and result in the heater flame going out.
How to fix it: the simplest way to remove air from the system is to run your gas appliances like the burners on your stove for a few minutes. This strong flow of gas should be enough to bleed the gas lines.

8. Faulty Thermal Fuse / ECO: The ECO (Energy Cut Off) is designed to protect the water from overheating (usually beyond 120 to 140 degrees.) If it gets dirty as a result of being exposed on the outside of your RV, it won’t read the temperatures accurately and may cause the igniter to malfunction.
How To fix it: Clean with sandpaper and reset. If this is ineffective, you may need to replace it with a new one. The cut-off switch is very inexpensive, and it’s worth carrying a spare in case it malfunctions while you’re on a trip.
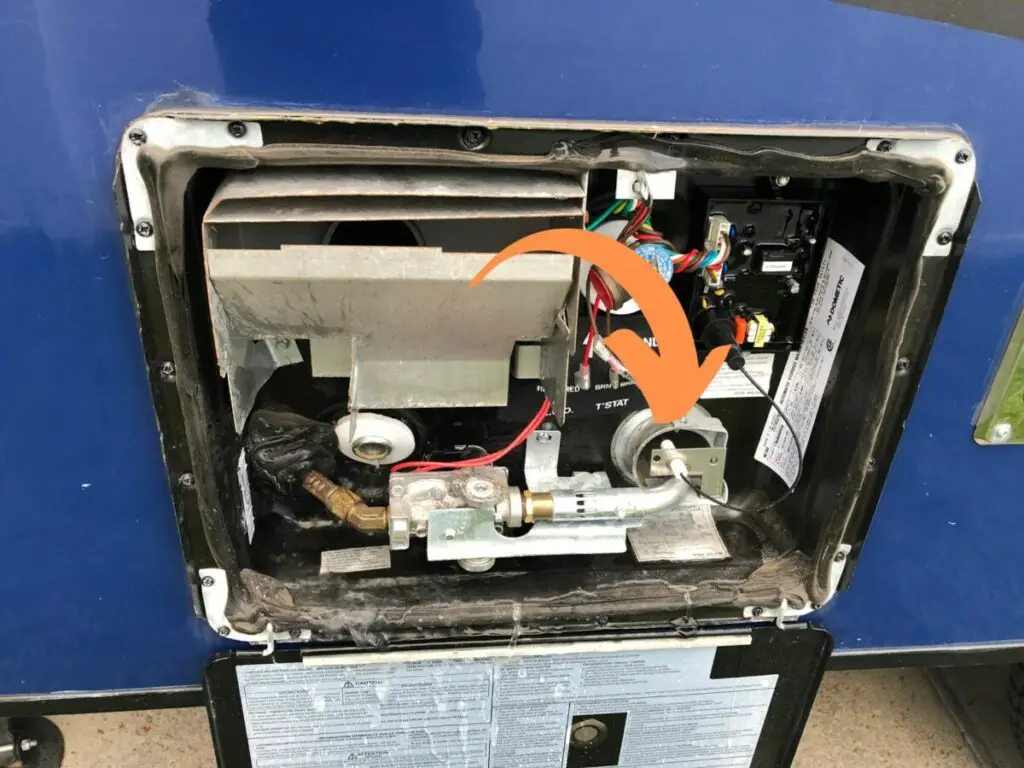
9. Dirt Build-Up In The Gas Feed To The Igniter: The tube leading from the gas valve to the igniter is exposed to dirt, insects, and spider webs and can also corrode at the air-mixture control. Partial blocking of this tube will cause the gas pressure to drop and the flame to be turned off after a few seconds.
How to fix it: This section of your water heater system must be regularly checked and cleaned as part of your regular maintenance. Check for any cracks in the tube, remove any dirt by blowing it out with compressed air, and reconnect. Then check the flame at the igniter – it should be a solid blue flame tipped with orange – and adjust the air/gas mixture with the sliding vent in the tube until you have the perfect flame.
10. Clogged Burner Orifice: The burner orifice is a precision hole in a brass fitting that regulates the gas flow before it is mixed with air and fed through to the igniter. If it gets blocked no gas will get through and the pilot light will not ignite. If it’s partially clogged the pilot will light but will go out after a few seconds.
How to fix it: Don’t try to clean the orifice with a sharp object. Being made of brass, the unit is easily damaged and can’t be repaired. Instead, use compressed air to blow out any dirt or use a cloth and alcohol-based cleaner.
Troubleshooting and Solutions for RV Water Heater
Checking the Supply
Ensure that your RV water heater is receiving adequate power, either from battery power or shore power. Check your propane supply as well, making sure there are no obstructions in the gas line. If you have propane water heaters, open the manual gas valve, and verify that it is functioning correctly.
Inspection and Cleaning of Gas Valve and Propane System
Regular maintenance of your gas valve and propane system is necessary for optimal performance. Look for any formation of debris or dirt that might hinder the gas flow. Clean the valve and propane system, paying close attention to remove any obstructions.
Pilot Light and Igniter Issues
If you have difficulty igniting the pilot light, start by adjusting the probe to ensure it senses the spark. Keep the area around the igniter clean and maintain it to avoid buildup affecting its performance.
Assessing the Thermostat
Confirm that the temperature setting on your thermostat is at an appropriate level. If the water heater isn’t maintaining the desired temperature, you may need to adjust the thermostat or replace it if it is faulty.
Testing Fuses and Wiring
Use a multimeter to test the fuses and wiring for any issues. Check that all connections are secure and look for any signs of wear or damage. Be sure to have a spare fuse on hand in case any need to be replaced.
Inspecting Control Board and Circuit Board
Examine the control board and circuit board for any signs of damage or malfunction. Make sure all connections are secure, and if the boards appear damaged, consider replacing them.
Caring for the Thermocouple
The thermocouple is crucial for maintaining the flame in your RV water heater. To keep it functioning properly, clean the area around it regularly to prevent debris buildup, and ensure that it is securely connected and in good condition. If issues persist, it may be necessary to replace the thermocouple.
RV Water Heater Preventive Maintenance Tips
Regular maintenance of your RV water heater can help prevent issues and keep it running efficiently. Here are some tips to follow for regular maintenance:
- Inspect and clean: Regularly check for dust, debris, and insect nests around the heater and its components. Carefully clean these, ensuring the area is free of obstructions that can affect the heater’s performance.
- Check Gas Valve: Examine the gas valve for signs of wear, damage, or corrosion. Replace the valve if it appears damaged, as a faulty gas valve can prevent the heater from staying lit.
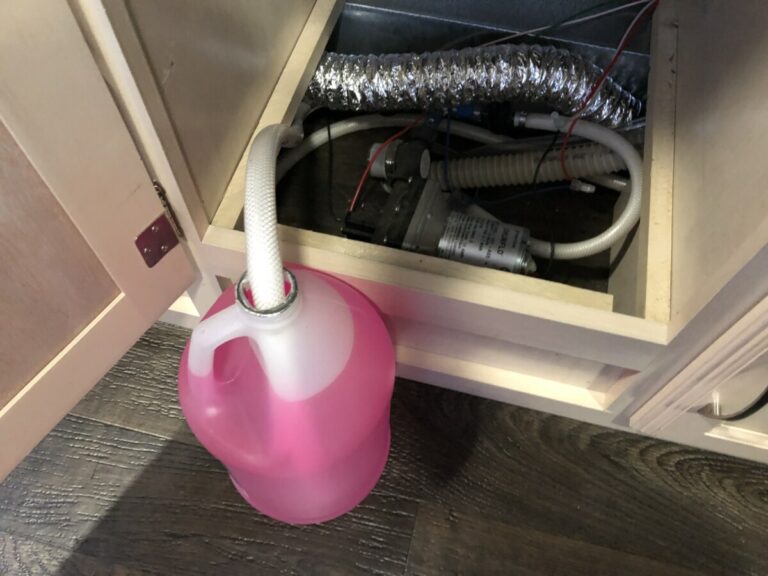
- RV Plumbing: Maintain your RV’s plumbing system to prevent water heater issues. Regularly inspect the system for leaks, damaged pipes, or other problems. Promptly address any issues to avoid affecting the water heater’s performance.
- Corrosion: Regularly check your water heater’s burner assembly and heat exchanger for signs of corrosion. This can impede the flow of gas, causing the heater to fail. Clean or replace corroded elements as necessary.
- Gas Line: Inspect the gas line for leaks or damage. A compromised gas line can prevent your water heater from functioning properly. Replace or repair gas lines that show signs of wear or damage.
- Fuses: Ensure the fuses connected to your water heater are functioning correctly. Replace any blown fuses to ensure adequate power is supplied to the heater.
By diligently following these preventive maintenance tips, you can help your RV water heater stay lit and avoid potential problems down the road.
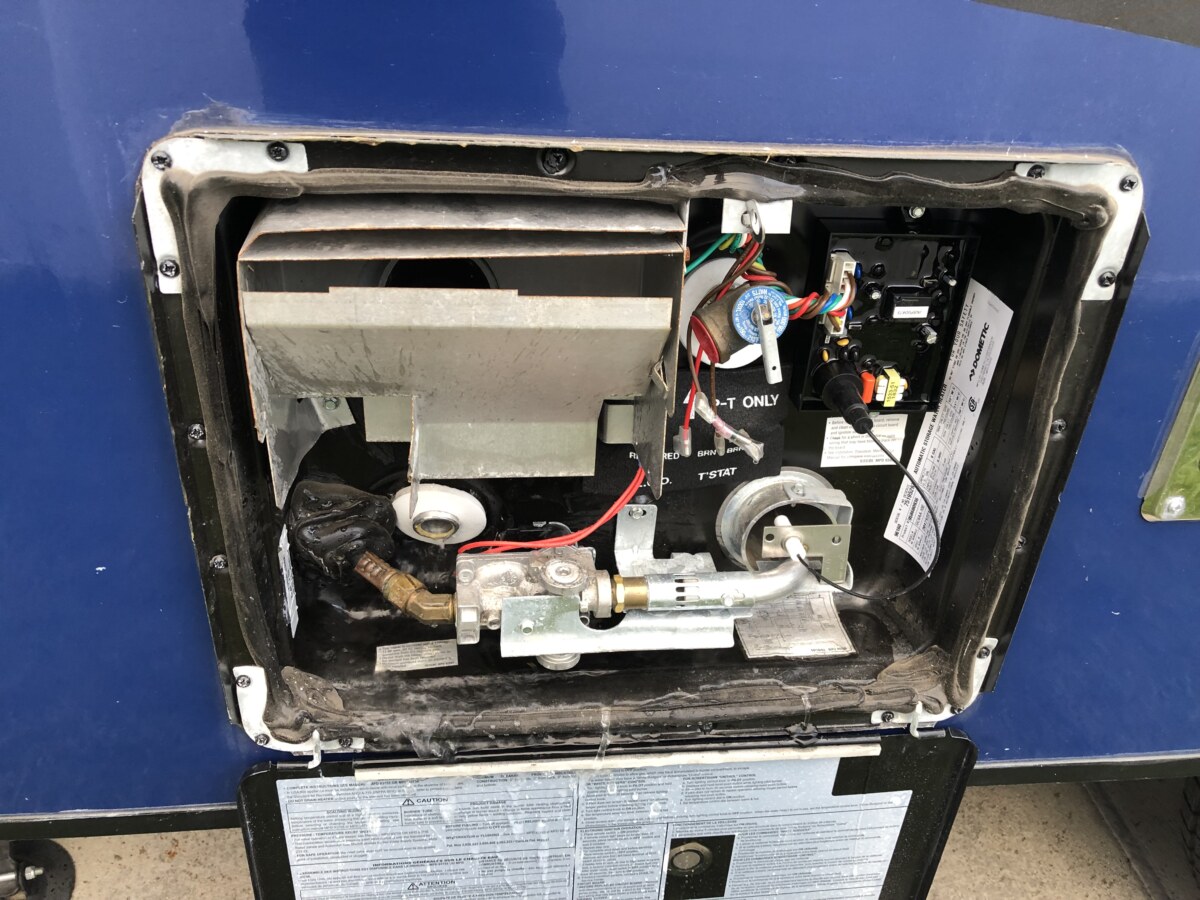
RV Water Heater Components
When it comes to your RV water heater, there are several components that work together to ensure that you have hot water supply in your motorhome. Understanding these components can help you pinpoint the issue when your RV water heater won’t stay lit and provide guidance on fixing it.
Your RV water heater typically consists of a tank, gas valves, burner, electric elements like a coil, and a control system. The tank stores the water to be heated, while the gas valves and electric elements work together to heat up the water according to the type of water heater you have. Some RVs might have an Atwood or Dometic hot water heater, while others may have a tankless water heater. Both types require different approaches for troubleshooting and maintenance.
The main source of fuel for an RV water heater is typically a propane tank, though some newer models might have an electric water heater or a combination of propane and electric systems. RVs with a DSI (direct spark ignition) water heater will rely on an electric element for ignition, while others may use a manual pilot light.
An important part of the heating process is the anode present within the water tank. This small, replaceable rod prevents corrosion, thereby prolonging the lifespan of your water heater tank. Regular inspection and replacement of the anode is crucial to maintain the functionality of your hot water heater.
Another critical component in an RV water heater is the electric element responsible for heating the water. In some cases, failure of the element can cause the water heater to malfunction. A voltmeter can be used to diagnose whether the electric element is functional or needs replacement.
Dealing with Hard-to-Remove Build-Up
When dealing with a persistent issue of your RV water heater not staying lit, it’s important to address any hard-to-remove build-up that may have formed. Dirt, corrosion, and cobwebs can all contribute to the formation of build-up, which can hinder the proper functioning of your water heater.
First, ensure that your RV water heater is turned off and cooled down before attempting any cleaning or maintenance. To remove dirt and other debris, use a dry cloth or a soft brush to gently clean the exterior and the surrounding areas. It’s crucial to remove any cobwebs, as they can cause obstruction to the airflow and prevent the heater from staying lit.
Inspect the burner assembly for signs of corrosion or other build-up. If you notice any corroded parts, it’s essential to clean them thoroughly to ensure optimal performance. Using sandpaper or a soft wire brush, gently remove the corrosion from the affected areas. Be careful not to damage any delicate components of the burner assembly while doing so.
For persistent dirt and build-up, compressed air can be an excellent tool to help you dislodge and clean these areas effectively. Use a compressed air canister or an air compressor with a nozzle attachment to direct the airflow towards the build-up. Make sure to maintain a safe distance and angle to avoid causing damage to the components.
After addressing the build-up, it’s important to test your RV water heater again to see if the issue has been resolved. Keep in mind that regular maintenance and cleaning of your water heater components can go a long way in preventing hard-to-remove build-up and ensuring your water heater stays lit consistently.
When to Consult a Professional
If you’ve already tried troubleshooting the common issues with your RV water heater and it still won’t stay lit, you should consider seeking the help of a professional technician. They have the expertise and necessary equipment to diagnose and repair your water heater safely.
Dealing with a damaged electric water heater element can pose a risk of electrocution if you’re not experienced in working with electrical appliances. It’s better to avoid any potential hazards by having a licensed technician assess and replace the faulty element.
Another reason to consult a professional is if you suspect that there’s an issue with your RV water heater’s igniter. While you can occasionally clean and adjust the igniter yourself, incorrect handling might cause damage to the system. A qualified technician will know the proper methods for handling the igniter and can ensure it’s functioning correctly.
Lastly, if your water heater’s circuit board is potentially damaged, it’s best to let an expert handle the repairs. Circuit boards contain delicate components that can easily be damaged if not handled properly. A professional will be able to test and repair or replace your water heater’s circuit board effectively and safely.
Remember, your safety should be the top priority while working on any appliance repairs. Sometimes it’s worth the expense to consult a professional technician to avoid injuries and ensure the proper function of your RV water heater.
Model-Specific Considerations
When trying to understand why your RV water heater isn’t staying lit and how to fix it, it’s important to consider the specific model of your RV water heater. Different models may have different quirks or design elements that can affect the way they operate.
With older models, you may find that the ignition system isn’t as advanced as those found in newer models, making it more prone to failure. In cases like this, it may be necessary to manually light the pilot light or replace outdated parts to get your water heater up and running again. Additionally, older models might have worn out components that are responsible for maintaining the flame, such as the thermocouple or gas control valve.
Newer models of RV water heaters typically have a more efficient ignition system and are less likely to have the same issues as older models. However, they are not immune to potential issues. It’s essential to listen for the sound of the igniter attempting to spark the propane when you’re troubleshooting. If you don’t hear it, it could indicate a problem with the ignition system itself. Check your RV’s fuse box to ensure the water heater’s fuse is intact and not blown. If it is, replace it as needed.
We have had to replace our water heater chip as it failed in the past. This was pretty easy to do!
The propane tank is crucial in keeping your RV water heater lit. Make sure there is enough propane in your tank to fuel the water heater. You can estimate the propane level by checking the tank’s gauge or listening for the sound of propane when the valve is opened. If your tank is running low, simply refill it to ensure there is an adequate propane supply for your water heater. It’s also a good idea to check for any potential leaks in your propane system, as this could affect the performance and safety of your RV water heater.
When investigating your RV’s water heater issues, don’t overlook the fuse box or breaker panel. If there is a blown fuse, it could prevent the ignition system from functioning properly. Locate the specific fuse for your water heater and replace it if necessary to restore proper function. Always remember to turn off the power to your RV before working with the fuse box to prevent electrical hazards.
Lastly, inspect the ignition system itself. Ensure that all connections are secure and there is no visible damage to the wiring or components. Look for signs of corrosion or loose connections that could disrupt the electrical flow needed to keep your water heater lit. If you discover any issues, address them promptly to maintain a reliable and well-functioning RV water heater.
By considering the unique characteristics of your RV water heater model, you can better identify and address the factors preventing it from staying lit, resulting in a more comfortable and enjoyable RV experience.
Frequently Asked Questions
Why does my RV hot water heater keep turning off?
Your RV hot water heater might be turning off due to a few reasons. It could be because of a faulty thermostat, a malfunctioning high-limit switch, or low propane levels. To fix this, you can check if the thermostat is set to the right temperature, replace the high-limit switch if required, or refill your propane tank.
Why does my RV water heater fire up then go out?
If your RV water heater fires up but goes out shortly after, it could be due to a blocked or dirty flame sensor. Cleaning the flame sensor with a soft brush can rectify this issue. If the problem persists, consider getting it inspected by a professional.
Why won’t my water heater stay ignited?
Your water heater might not stay ignited due to insufficient gas supply, blocked air intake, or a malfunctioning igniter. Ensure that your propane tank is full and the gas valve is open. Check for any blockages in the air intake and clean it, if necessary. If the igniter is not working, consulting a professional is recommended.
Why is the pilot light not staying lit on my RV water heater?
A pilot light that keeps going out could be due to a dirty pilot tube, a damaged thermocouple, or a faulty gas control valve. Cleaning the pilot tube, replacing the thermocouple, or assessing the gas control valve can help resolve the issue.
What causes an RV water heater to click but not light?
An RV water heater that clicks but does not light might be experiencing an issue with the igniter, gas supply, or a blockage in the burner tube. Start by examining the igniter and gas supply to ensure it is functioning correctly and there is adequate gas flow. If those are not the issue, check the burner tube for any obstructions or debris.
Be the first to be notified about FREE tips, hints, coupon codes, and email-exclusive information. All for FREE!