RV Water Heater Thermocouple Testing and Replacement: A Step-by-Step Guide
Being on vacation camping can be very frustrating when your water heater stops producing hot water. Trust me, I know all about it. On our first trip our hot water heater stopped working on the gas function and we did not have plug ins. So frustrating!!!
The first thing many of us will do is check the pilot light. Inevitably it will be out. On the other hand, it could be the wind, so you light it again, and after a few minutes, it goes out again. After some research, you will find suggestions for testing and replacing your thermocouple.
When testing or replacing the RV water heater thermocouple, first, you must shut off the gas. Then after locating the thermocouple, use a multimeter to check resistance. Then heat the thermocouple with an open flame to test the current. If there is no reading on either, replace it with a new one.
Here is an excellent guide on testing if your thermocouple needs replacement. If it needs replacement, we will guide you through replacing it. We also included a bonus section on cleaning the thermocouple from soot buildup.
How Do You Test If The Thermocouple / Igniter Is Working
Using a digital multimeter, you should check the resistance and current of the thermocouple. With proper resistance and current flow, the thermocouple will not work, and your gas supply safety cut-off switch will activate and extinguish the flame.
Tools You Required To Test And Replace An RV Thermocouple
- Screwdriver (Phillips, hex, or flat-head)
- A multimeter that can test milliamps and resistance
- Adjustable wrench
- Long nose pliers
- Replacement thermocouple (and installation guide included in the box)
- Utility Lighter to reach the thermocouple.
Step 1: Turn Off The Gas Supply
First, you must turn the gas supply off to your water heater, stove, or furnace by locating the gas valve and turning the knob to the “Off” position. You can also uncouple the gas bottle if you are unsure of where the turn-off switch is.
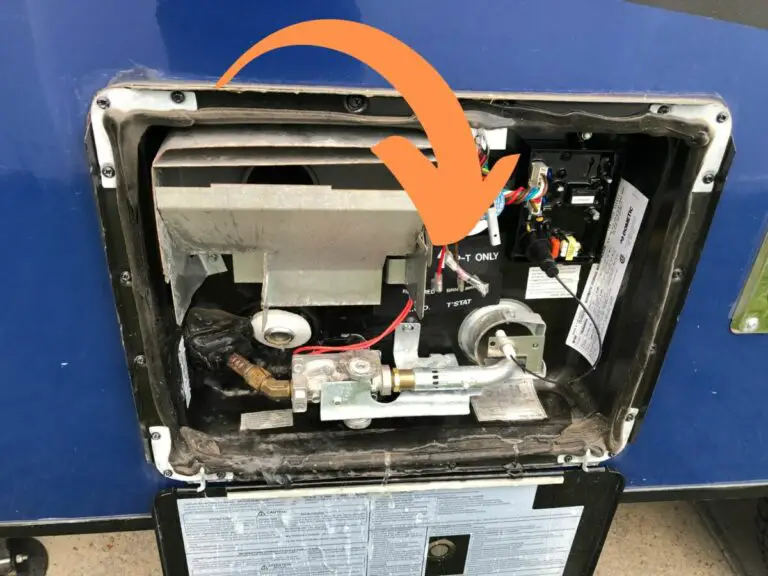
Step 2: Locate The Thermocouple
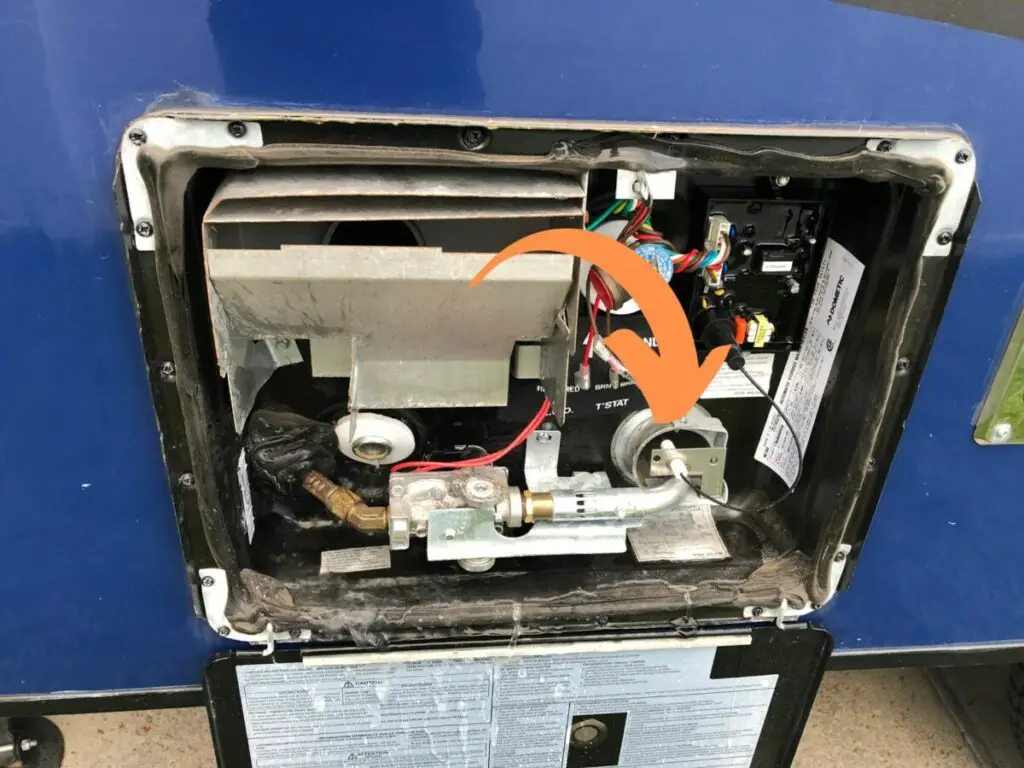
The first thing to do is test the thermocouple’s resistance. Locate the thermocouple attached to the plate next to the pilot light. It should look like a metal rod that extends into the flame. Follow the thermocouple’s body, and it should have 2 wires going into the electronic box.
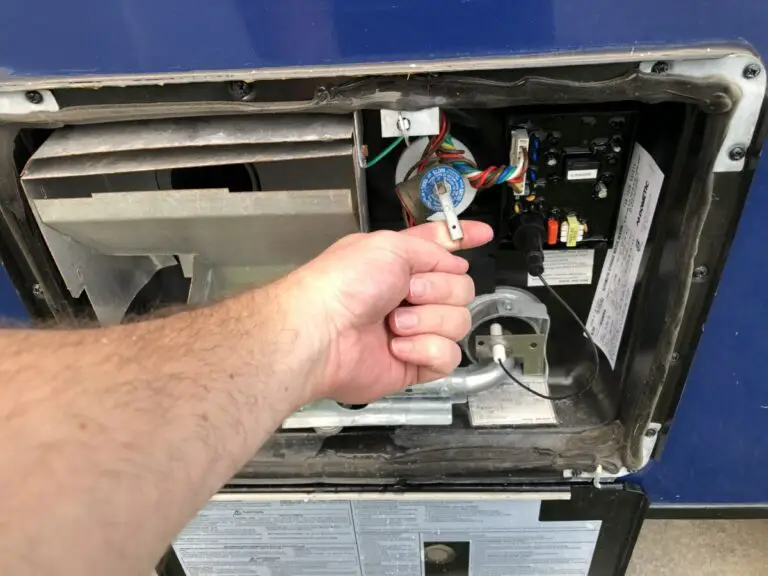
Step 3: Locate The Thermocouple’s Leads
Open the box and follow the leads from the end of the thermocouple to where it goes into the electronic housing. You will see where it is plugged in. It will say something like J3 and J11 thermocouple, but it depends on your system.
Step 4: Test The Thermocouple’s Resistance
Carefully remove the thermocouple leads with longnose pliers from the electronic board. Now you are ready to start to test with the multimeter. A thermocouple is supposed to have meager resistance. Place the positive (Red) on one cable and the negative (Black) lead on the other. Turn the multimeter on and select OHM (Ω) for resistance. If you get 0.3 to 0.5 ohms, your thermocouple resistance tests were good.
Step 5: Test The Thermocouple’s Current
Then the next thing you’re supposed to do is to check the current. How a thermocouple works are while it is hot, it will have a current flow. The moment it cools down, the amperage will fall and will cause the gas valve to shut off. If the pilot light goes out, this safety mechanism prevents your RV from filling up with gas.
Now sets your multimeter to DC milliamps (mA). Heat the thermocouple’s head (the end where the pilot light is) with a lighter, or turn the gas back on and ignite the flame. It will almost immediately start going up in milliamps. A good reading should be between 20 and 30 mA. If it is below 20, but above 10mA, you might have a dirty thermocouple, which needs a good cleaning.
If it has no resistance or current, you will need to replace it. See the section on replacing the thermocouple.
A good cleaning might be all you need if it has a low current but good resistance. See the section on cleaning the thermocouple.
Step 6: Turn The Gas Back On
Reconnect the gas supply and turn the gas valve knob to the “On” position if you did not do it in step 5.
If you are out at the campground and your thermocouple is not reading heat, try using some sandpaper to lightly sand down the metal. This may remove a block up of soot so it can start reading again. Once you are back at camp, look into purchasing a new one to have as a backup. Here is a good replacement model.
How To Replace The Thermocouple
Here are the replacement steps you need to follow to exchange the RV water heater thermocouple.
Step 1: Turn Off The Gas Supply
Before working on them, you must first turn off the gas supply to the RV’s stove, furnace, or water heater. Typically, this is accomplished by adjusting a valve on the main gas line or near the affected appliance. Turning off the gas supply while working is critical to avoid gas leaks or fires.
Step 2: Locate The Thermocouple
Locate the thermocouple near the control valve of the RV stove or furnace. The metal probe detects heat from the flame and sends a signal to the control valve, which keeps the gas flowing. Look for a metal rod that extends from the valve to the fire.
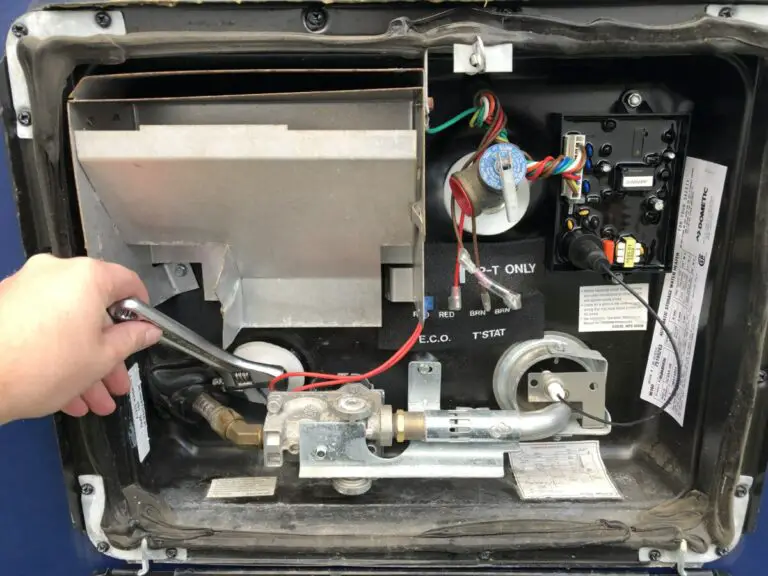
Step 3: Remove The Thermocouple
You must locate the screws or nuts that secure the thermocouple to the control valve. Once located, use an adjustable wrench or screwdriver to unscrew the nuts or screws. To avoid damage, the control valve and other sections of the gas system must be handled with care.
Step 4: Get A New Thermocouple
When replacing a thermocouple, look for one with the exact dimensions of the old one. The new thermocouple should have its own installation instructions. Follow the instructions to ensure that the new thermocouple is securely fastened to the control valve. Suppose the thermocouples are not the correct length and diameter for the appliance in which they are used. In that case, they may cause problems in the future.
Step 5: Install And Test The New Thermocouple
After installing a new thermocouple, relight the gas and inspect the stove or furnace to ensure it is operating correctly. If everything is in order, the flame will stay lit even after you remove your hand from the control knob.
However, suppose the flame goes out after releasing the control knob. In that case, the problem may be due to an incorrect installation or a malfunctioning fault. If that is the case, your best option would be to call a professional to take a look.
When replacing a thermocouple in your RV, it’s critical to follow these steps carefully and to take all necessary safety precautions. You should call a professional if unsure about any of the processes.
How To Clean The Thermocouple
Before cleaning the thermocouple, you must follow the abovementioned steps to safely remove it. After you finish cleaning the thermocouple, follow the steps above to reinstall it the correct way.
You can clean the thermocouple’s end of debris or buildup with emery cloth sandpaper. Corrosion should be removed from the terminal where the power wire connects to the thermocouple. Remember that the thermocouple may need to be removed if you intend to thoroughly clean the burner assembly. Wipe the component clean with a lint-free cloth to remove any remaining debris.
What Causes Thermocoupes To Stop Working
Thermocouples, like everything else, will wear out and need to be replaced. Temperature fluctuations from the heating and cooling of the thermocouple can cause the metal to expand and contract, weakening it over time. Sometimes you are lucky, and it lasts a long before metal fatigue can cause a thermocouple to fail.
Other factors can be corrosion on the leads connected to the electronic board or rodents that could damage the wires.
When you are in your RV water heater working, you may want to drain it and perform some additional maintenance. Here are two articles that can greatly expand the lifespan of your RV hot water heater
- How to properly drain and rinse your RV hot water heater
- 5 Maintenance tips for your RV hot water heater
Conclusion
First, turn off the gas supply, remove the old thermocouple, test it, and replace it if necessary. Obtaining a new one with the exact dimensions and installing and testing the new one are all required to replace a thermocouple. Checking and, if necessary, replacing the thermocouple in your water heater can ensure the safety of your RV and your vacation. If the thermocouple is dirty, it may need to be cleaned.
Be the first to be notified about FREE tips, hints, coupon codes, and email-exclusive information. All for FREE!