Best Practices when Using an RV Dump Station
Dumping your RV may be one of the least favorite parts of any trip. I know for me, it is a hassle, hate when people are waiting on me, and just don’t like it. After I developed a good system, I am pretty efficient and don’t mind the process. Here is my process below:
How to use an RV dump station?
1. Drive up to the dump station
Most campgrounds have a centralized dump station that everyone in the campground can use. While other campgrounds have a dump outlet at every campsite, allowing for the RV to stay connected to it during their stay. However, if you are dry camping, then you will need to look for a dump station.
Once you have located a dump station, pull up to it and park on the side of your RV’s dump outlets. Also, leave enough space between the RV and the dump station for your sewer hose. typically about 4 feet. If you are too close or too far away to the outlet, you will have a difficult time using the sewer hose.
2. Put gloves on and get materials out
Before starting the dumping process, always wear disposable gloves or gloves that you use solely for this purpose. Since you will be dealing with waste and touching the dump outlets, that many, many people use, it is important to protect yourself from touching something that could potentially get you sick.
The next step is to pull out the hose kit. Some RVs come with a designated space for the hose and hose kit, usually under the RV. But if your RV does not, you may be able to store yours in your rear bumper. If you have neither, then it is a good idea to keep the hose kit in a plastic box in the cargo space under the RV.
A good hose kit will include the hose, a clear elbow dump station fitting, a swivel fitting, and storage caps. The clear elbow attaches to one end of the hose. The dump station fitting attaches to the clear elbow. This end of the hose goes into the dump outlet. The swivel fitting attaches to the opposite end of the hose which attaches to the RV’s outlet. The storage caps attach to each end of the hose when the dumping process is complete. If you do not have a hose kit, or need to replace yours, here is our review on top RV sewer hose kits, or just skip the article and buy the one we recommend below.

Last update on 2026-06-05 / Affiliate links / Images from Amazon Product Advertising API
3. Attach a hose to dump station with a 90-degree angle
When attaching the hose to the dump station’s outlet, it is important to use a 90-degree angle clear elbow. This elbow will help the contents drain easier and help prevent clogging. The elbow also prevents the hose from getting a bend in the line. Finally, the hose line can stay straight as it attaches to the elbow.
Also, be sure to use a clear or translucent elbow so that you can see when the contents have drained. Once the waste has passed into the dump outlet, the water will turn clear. It is important to have someone in the bathroom of the RV pouring clean water down the toilet, or using the black tank flush. By following this step, the clear water helps flush out the holding tank and ensures there are no clogs in the system.
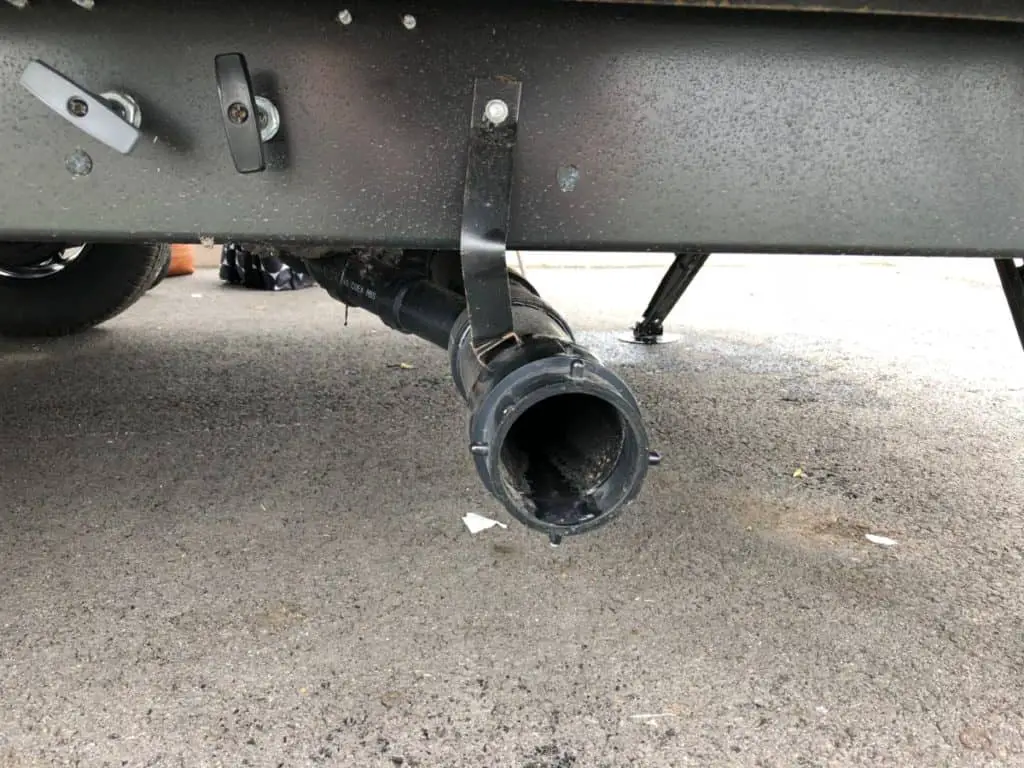
4. Make sure dump valves are closed and remove the cover
Before you open any of the covers, make sure the valves are closed. The valves are levers that you pull outwards from the outlet. Make sure the valves are pushed in, which means they are closed. If the valves are open, this will lead to waste spilling onto the ground when you remove the cover.
Once you have checked the valves, remove the cover. Some valve covers don’t stay attached to the RV outlet, like in a car’s gas tank. If this is the case for your cover, lay the cover on the ground while dumping your holding tanks. Do not lose the cover, make sure to lay it somewhere safe.
Some people like to add an additional valve as sometimes they leak. The product below will ensure you never have a leaky mess.

Last update on 2026-06-25 / Affiliate links / Images from Amazon Product Advertising API
5. Attach a hose to dump outlet
Next, attach the hose to the RV outlet. Then attach the 90-degree angle side to the dump outlet. Make sure to have the dump fitting fastened tightly in the sweer dump on the bottom of the elbow. If it is not attached, the hose may come loose and lead to a mess.
It is important to check the hose to ensure both ends are connected to the dump station’s outlet and your RV’s outlet before opening a valve. If one end is not connected, this could again lead to waste spilling out onto the ground.
6. Check Connections
Not only do you need to check to see if the hose ends are connected, but also make sure both ends are tightly connected to both outlets. If you purchase a cheaper hose kit, sometimes you pay for what you get, which would be a hose kit that doesn’t work well.
When purchasing your hose kit, invest in a good one. The better hose kits have several locking tabs that secure the connection between the hose and the outlets. If those locking tabs are not secure or gaskets are cracked, wastewater can leak from the sides of the connection.
7. Open black tank, close when done.
Two types of tanks need to be dumped, a black and grey water tank. The black water tank is storage for waste from the toilet. The grey water tank holds liquids from the shower, bathroom and kitchen sinks.
If you are staying at a campground and will constantly be hooked-up to a dump station, do not leave that black water tank valve open. You must keep it closed until the tank is at least 2/3 full.
There are two reasons why you shouldn’t leave the valve open at all times. The first reason is that this valve works on pressure. If there is not much waste in the tank there will not be enough pressure to push the waste out. The second reason is the liquids would drain but the solids would not. The solids would then harden and block the line, which you want to avoid. To see how full the black water tank is, you will need to check the panel that is located inside your RV.
If you are ready to dump the waste, open the black water valve first. It will take a few minutes to flush everything out. Since you have the clear 90-degree elbow on the hose, you can see when the contents have been dumped because the water will turn clear. A good idea is to have someone inside the RV dump water down the toilet to help flush all of the contents out of the black tank if you do not have a black tank flush. Once complete, then use your black tank flush system. If you do not have this system then close the valve. If you do, go on to step 8.
8. Use black tank flush if equipped
Some RVs come with a black tank flush system. This system is located on the outside of your RV close to the hold tank valves. To use the black tank flush system, attach the water hose, either the one at the dump station or your own, to the RV. Turn the water hose on and this will push water into your black tank and will flush the black water out with its internal sprinkler. As you are completing this step, the dump hose is still attached to the RV and the dump outlet. Also, very important, make sure the black water valve is open. If not, once you turn on the clean water, this water can back up into the RV if the valve is closed.
This is an important step to do to ensure all of the solid waste has been flushed out of the holding tank. However, if your RV does not come with a black tank flush system, not to worry. The water that someone inside the RV is pouring down the toilet, as you dump your black water, will help push the waste out of the system.
9. Open grey tank, close when done
After you drain the black water tank, open the grey water valve. It’s a good idea to open the grey water valve second so that it can flush out the hose behind the black water. A grey tank valve still shouldn’t be left open the entire time you are hooked up to a dump outlet as harmful vapors can leak in. The greywater flows out with ease.
If you are camping where there are no hook-ups, that is perfectly fine. Your grey tank can hold a few days’ worth of liquids and can be dumped once you find a dump station. It will take a few minutes to dump the grey water tank, just like the black water. Once you have completed dumping your grey water, close the valve.
10. Rinse sewer hose
There will be a hose at the dump station that is to be used solely to clean out the dump hose, the area around the dump station, and for the black tank flush system. Do not use this water for drinking or filling up your freshwater tank. If there is not a hose at the dump station, it is best to keep a spare in your plastic box with the sewer hose kit. Use this hose only for this purpose, do not use it to fill your freshwater tank.
There is generally a water outlet that you can attach to at the dump station. However, if there is not a water hose then there may not be a water outlet. If this is the case, then pull to your campsite or somewhere that has a connection. It is important to clean all parts of the dump kit and to leave the dump station cleaner than you found it.
11. Clean items with bleach spray
Since you are dealing with sewage, you need to clean everything that you used for this process. It is best to use bleach when cleaning your hose kit. Wash the dump hose with bleach and clean it inside and out, with all of the additional parts. After spraying with bleach, hose off all of the parts with clean water. Use the water hose that you used for the black water flush.
12. Put tools away
Once your hose kit has been cleaned, put all of the parts in your plastic box or designated storage area in your RV. Once these items have been put away, take your gloves off. Immediately use hand sanitizer or wash your hands.
You need to use hand sanitizer immediately because you will not have time to wash your hands before touching anything else. You do not want to spread germs to the door handle and potentially other people that you are camping with. A second reason is due to having to move your RV. You will most likely have someone waiting behind you to use the dump station and will need to move your RV quickly. It just the healthiest decision to use hand sanitizer immediately.
This is our step by step guide to help you empty your sewer kit with no stress and as quick as possible, so get out and have fun camping!
Be the first to be notified about FREE tips, hints, coupon codes, and email-exclusive information. All for FREE!