How long does it take for RV pipes to freeze?
The problem of frozen pipes is one of the biggest issues with winter camping. The rate at which RV pipes will freeze varies on the temperature and speed of temperature change.
How long does it take for RV pipes to freeze? In general, the temperature has to dip below freezing (32 F) for approximately 24 hours for RV pipes to freeze. This is all dependent on many factors such as if you have an enclosed underbelly, heated underbelly, heat tape, insulation, or other preventative measures in place.
Even if you aren’t planning to spend your winter in Alaska, it’s smart to be prepared whenever you’re in an environment with the possibility of freezing temperatures! Luckily, there are many methods to choose from. You can prevent freezing by insulating your pipes, using heat tape/cord, investing in a heated water line, heating your wet bay, using a tank heater, heating the underbelly of your rig, upgrading your RV’s insulation, skirting your trailer, and/or by keeping the water flowing in your rig.
Combine a few of these options to keep the water running in any temperature!
Why are frozen pipes a problem?
The obvious answer is that frozen pipes prevent you from using the water and water hookups in your RV. This can be at best a headache and at worst a trip ending catastrophe. In addition, frozen pipes can create serious long-term issues for your RV. Because ice expands, frozen pipes or tanks can burst, creating a major problem and requiring costly repairs and pipe or tank replacements. Bottom line, if you think you’ll be camping in cold weather, it’s important to take the time to prevent your pipes from freezing.
Ways to prevent your pipes from freezing:
Insulate your pipes
One big mistake many campers make is to insulate their RVs and internal water systems, but not their external pipes/hoses. This is an easy and cheap way to help prevent your pipes from freezing. You can purchase foam pipe wrap and install it yourself. This is basically foam pipe wrap with a slit to fit your pipe. For best results, use duct tape or electrical tape to secure the insulation around your pipes.
Use heat tape or cord on pipes
Heat tape can be wrapped around hoses to help prevent freezing. For best results, use tape along with foam pipe wrap. If you purchase a heating cord, you can use electrical tape to secure it to your pipes. It’s also a good idea to insulate and heat wrap the spigot and connection points, which can freeze and prevent you from using running water.
Use a heated water line

This is a quicker and easier system then using foam pipe wrap or heat tape. Invest in a heated water line so you can maintain your exterior water connection, even in cold weather. Here is one one option that claims to prevent freezing even in negative temperatures. You will also still need to insulate connection points. However, if temperatures are consistently low for long periods of time, it might be best unhook your water line and temporarily just rely on your freshwater tank.
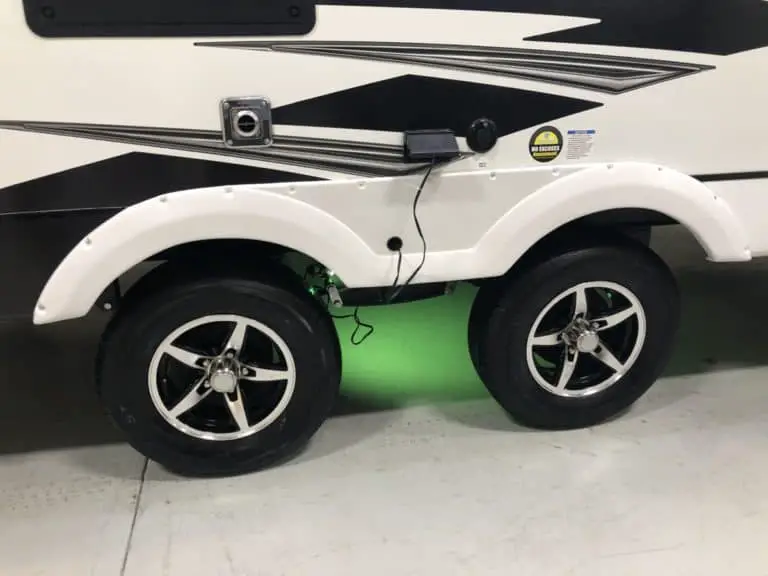
Heat your wet bay
The wet bay of your rig is vulnerable to the cold temperatures, and could be an area where your water pipes freeze. To prevent this, you can place a clamped electric light lamp in your bay. This will keep it just warm enough to prevent freezing, and is a quick and cheap solution (you can find these at any hardware store). This method is not recommended for extended periods.
Use a tank heater
A pad tank heater works directly in or under your water tanks to prevent freezing in cold weather. A 12 volt is a good option, and many “4 season” trailers come with them. You can also purchase one separately, like this tank heater pad.
Heat your underbelly with the built in furnace
Just like skirting, an enclosed underbelly will help prevent drafts and keep the bottom of your RV warm. It’s even better if you have a built in furnace, which can help keep pipes from freezing. If you plan to camp in winter conditions, choose a trailer that comes with a furnace of 30,000 BTUs or more.
Install and upgrade insulation
Similarly to houses, you can insulate the walls, floor, and/or attic of your RV with foam or fiberglass. The better insulated your rig, the warmer it will stay, which will prevent pipes from freezing. This will also save you money on your heating costs. Foam is a good option for cold weather and wet environments (because it doesn’t get moldy as quickly as fiberglass), and you can choose rigid or spray foam. Don’t forget to make sure that seals around windows and doors are tight, otherwise insulation won’t be effective. Investing in good curtains/blinds, as well as vent hatch insulation can also help to keep cold air out!
Skirt your trailer
Purchasing an RV skirt can help prevent drafts under your rig, and adds to the insulation of the vehicle. This will help keep your pipes, tanks, and passengers warm! There are many brands that offer skirting, including custom options, or you can make your own using materials such as plastic or styrofoam. For a last ditch option you can actually use snow to skirt your trailer, by piling it around the bottom of your RV! In every skirting situation, make sure not to cover exhaust vents.
Keep water flowing frequently
Moving water creates energy and as a result does not freeze as quickly or as easily as standing water. By utilizing your plumbing and water pump at regular intervals, you can help to prevent your RV pipes from freezing. Turn your faucets on regularly, and try to get water moving at least every couple of hours. This will also help you to be aware if your pipes begin to freeze or leak.
How to unfreeze your pipes
If you still find yourself with frozen pipes, the first thing to do is try to unfreeze the water that is in your pipes, and then check for leaks. Make sure your heat is turned up, and open cabinets and drawers, to try to get the heat circulating. If needed, you can even use portable heaters positioned near pipes to get this process going, and if you’re really desperate you can use a blow dryer! The “defrosting” process may take up to 12 hours. Avoid turning on your water pump, because this can cause more damage.
After the ice is out of your pipes, check for drips underneath your RV which could indicate leaks. Also check behind paneling in the kitchen and bathroom, and in storage areas. If there’s no obvious leaks, you still might want to get your trailer checked out when you return home, in case you have a slow leak or one that you can’t see due to the type of RV or insulation.
Go with the flow
Frozen pipes can ruin a trip and your RV! Make sure to take precautions when venturing into freezing temperatures, it is well worth the time and energy. It’s easy to be prepared, and most supplies are both readily available and reasonably priced.
Planning a winter trip? Read our full guide to staying warm while camping in the winter. Also, don’t forget to winterize even if you don’t use your rig in the winter (but are storing it somewhere where the temperature could drop below freezing). Need tips on how to winterize your trailer? Click here for a full guide.
Warm wishes and happy camping!
Be the first to be notified about FREE tips, hints, coupon codes, and email-exclusive information. All for FREE!